Options Window
Use the Options Window to change the way some of the commands operate. To open this window, click More -> Options.
Filing Tab
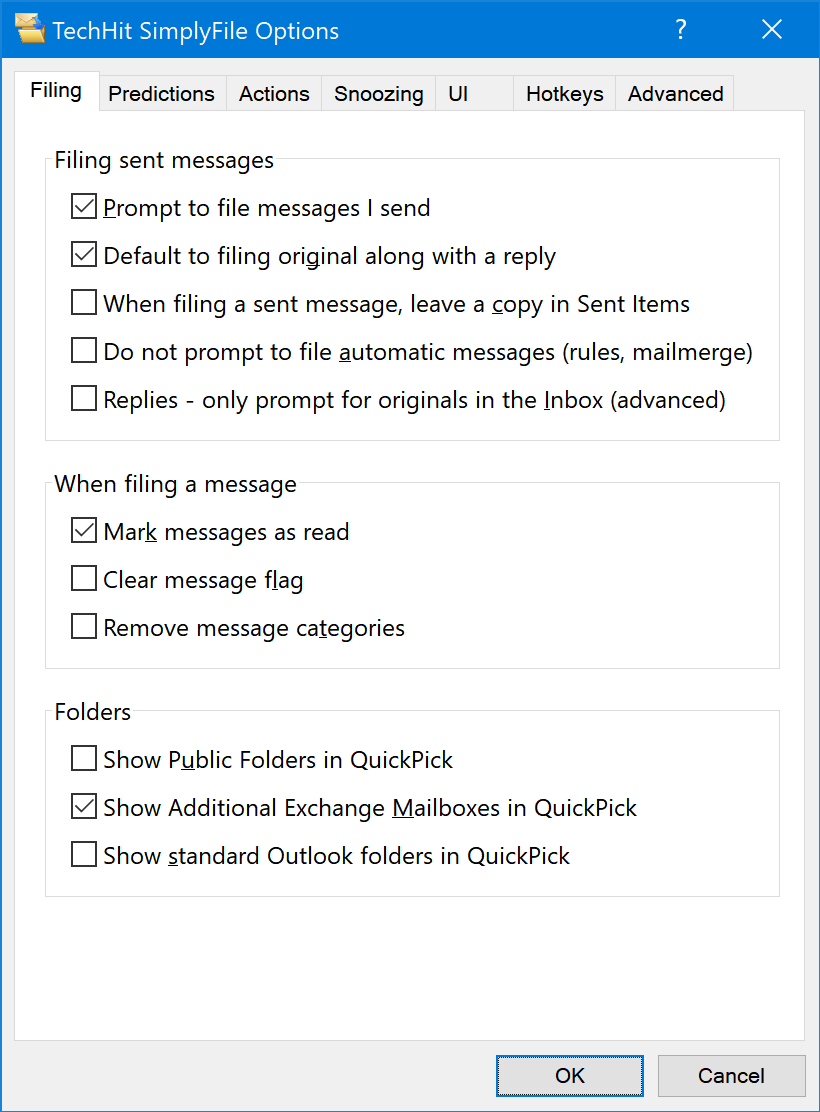
-
Prompt To File Messages I Send¶ Enable this option to have SimplyFile prompt you where you would like to file the message right after you click “Send” in Outlook. Disable this option if you prefer not to be prompted every time you send a message.
-
Default To Filing Original Along With A Reply¶ If this option is OFF, the Send and File is the default button in the File Sent Message Window. Enable this option to make the Send, File And File Original the default button of that window.
The default button of a window can be invoked by hitting the Enter, which is much faster than clicking it with a mouse.
-
When Filing A Sent Message Leave A Copy In Sent Items¶ Enable this option to file messages in both the folder you specify and Sent Items.
-
Do Not Prompt To File Automatic Messages¶ Enable this option to have SimplyFile not display its prompt to file automatically sent messages, such as auto-replies, mail-merge, etc.
-
Replies - Only Prompt For Originals In The Inbox¶ Outlook has a built-in feature When replying to a message that is not in the Inbox, save the reply in the same folder . If this feature works with the way you organize email, this option allows you take advantage of it. This will allow you to see fewer prompts to file sent message yet still have all your sent email filed in the right location.
Important: We recommend that you experiment with this feature to make sure you are comfortable with the way it works before enabling it permanently.
-
Mark Messages As Read¶ Enable this option to have SimplyFile mark messages as read when they are filed.
-
Clear Message Flag¶ Enable this option to have SimplyFile clear flags on messages as they are filed.
-
Remove Message Categories¶ Enable this option to have SimplyFile remove categories from messages as they are filed.
-
Show Public Folders in QuickPick¶ Enable this option to include all Public Folders in the list of folders shown in the Quick Pick Window. If you are not using Public Folders, disable this option for a small performance increase.
-
Show Additional Exchange Mailboxes in QuickPick¶ Enable this option to include folders from additional Microsoft Exchange mailboxes you access in Outlook in the Quick Pick Window. Additional mailboxes include your Online Archive, Shared Mailboxes and mailboxes of your coworkers who gave you access to their mailboxes.
-
Show Standard Outlook Folders in QuickPick¶ Enable to have standard Outlook folders, such as Deleted Items, Contacts, Tasks, Outbox, etc. shown in QuickPick.
Predictions Tab
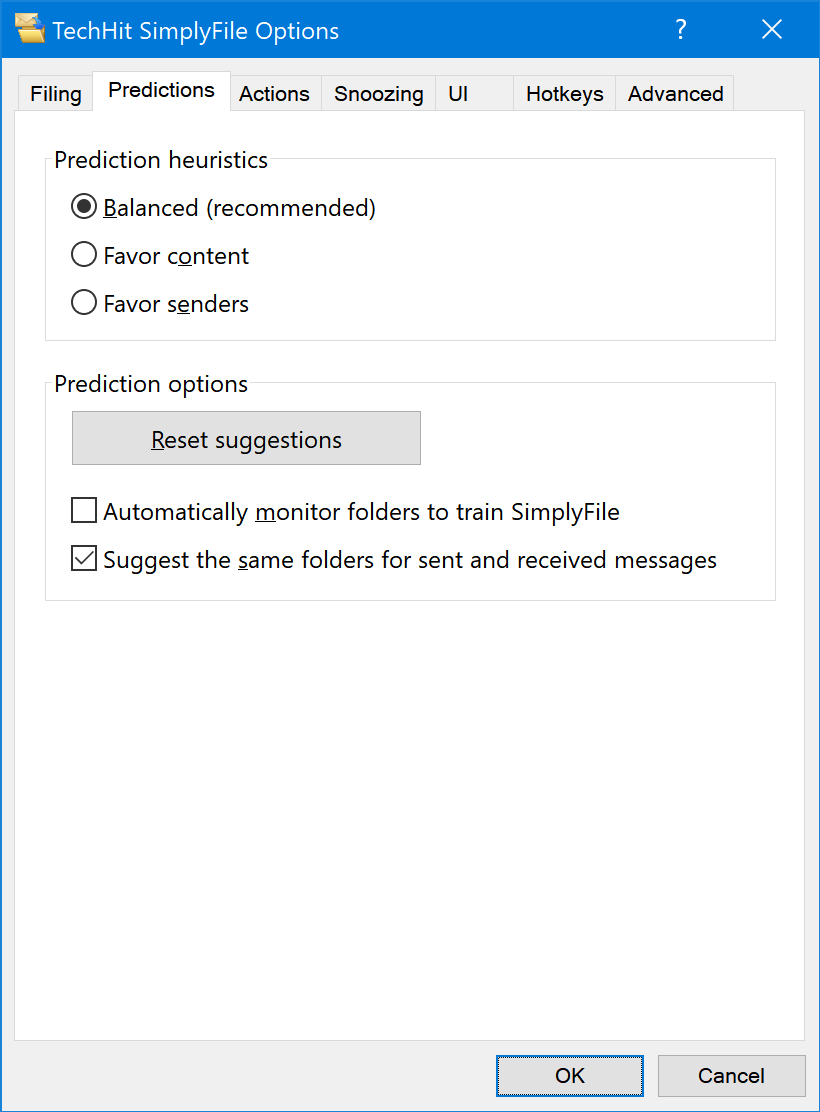
-
Predictions Heuristics¶ Controls how SimplyFile generates folder predictions.
-
Balanced¶ Default and recommended option. Uses a combination of message attributes for folder suggestions.
-
Favor Content¶ Give more weight to message content when making folder suggestions.
-
Favor Senders¶ Give more weight to sender and recipient information when making predictions.
-
-
Reset Suggestions¶ This button resets SimplyFile folder suggestion data. You will want to do this every time you re-organize your Outlook folder structure or change account configuration.
Tip
After you clear your filing history, use the Train SimplyFile command to quickly get SimplyFile folder suggestion engine up-to-speed on your new folder structure.
-
Automatically Monitor My Folders To Train SimplyFile¶ If this option is enabled, SimplyFile will train itself in the background. Even if this option is OFF, SimplyFile will still train every time you use it to file a message. This option will turn off after you manually run Train SimplyFile.
-
Suggest The Same Folders For Sent And Received Messages¶ Disable this option if you use different folders for sent and received messages and would like SimplyFile to learn about them separately. Most users will want to keep this ON.
Actions Tab
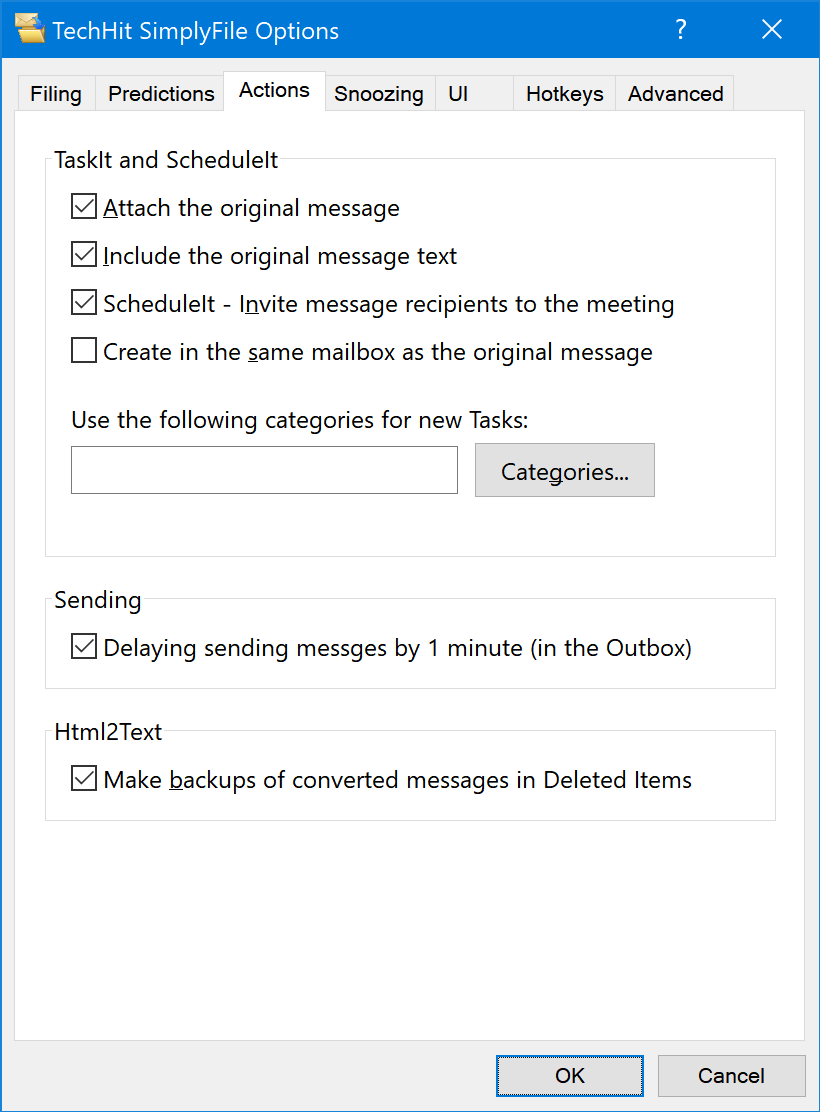
-
Attach The Original Message¶ Enable this option to attach the original message to Tasks and Appointments created using TaskIt and ScheduleIt commands.
-
Include The Original Message Text¶ Enable this option to include the original message body in Tasks and Appointments created using TaskIt and ScheduleIt commands.
-
ScheduleIt Invite Message Recipients To The Meeting¶ Enable this option to have the ScheduleIt command create a meeting and invite the original message sender and recipients to it.
Disable this option to create an appointment just for yourself.
We recommend keeping this ON so meetings are created by default. If you would like to turn a meeting into an appointment just for yourself, click Cancel invitation button on the Meeting Ribbon.
-
Create In The Same Mailbox As The Original Message¶ Enable this option to create Tasks, Meetings and Appointments in the same mailbox as the original message. Otherwise, they are created in the default mailbox.
If you only have one email account and mailbox, this option has no effect.
-
Delay Sending Messages By 1 Minute¶ Enable this option to keep all sent messages in the Outbox for one minute before they are sent. To stop a message from going out, open it in the Outbox folder.
You can override this option for an individual message you are sending by unchecking More Actions -> Delay Sending This Message in the File The Message You Are Sending Window.
You might have seen the “Undo send” feature in Gmail or other mail clients. It allows you a brief period of time when you can cancel sending a message. For example, this is great when you click Send and immediately recognize you addressed the message to the wrong person or forgot to attach a file.
Tip
If you are concerned about accidentally sending email to the wrong recipient, which can potentially result in serious issues, take a look at SendAware .
Tip
To make delayed messages easier to retrieve, you can add the Outbox to Outlook Favorites. (Right-click - “Add to Favorites”).
Snoozing Tab
These options control the SnoozeIt operations.
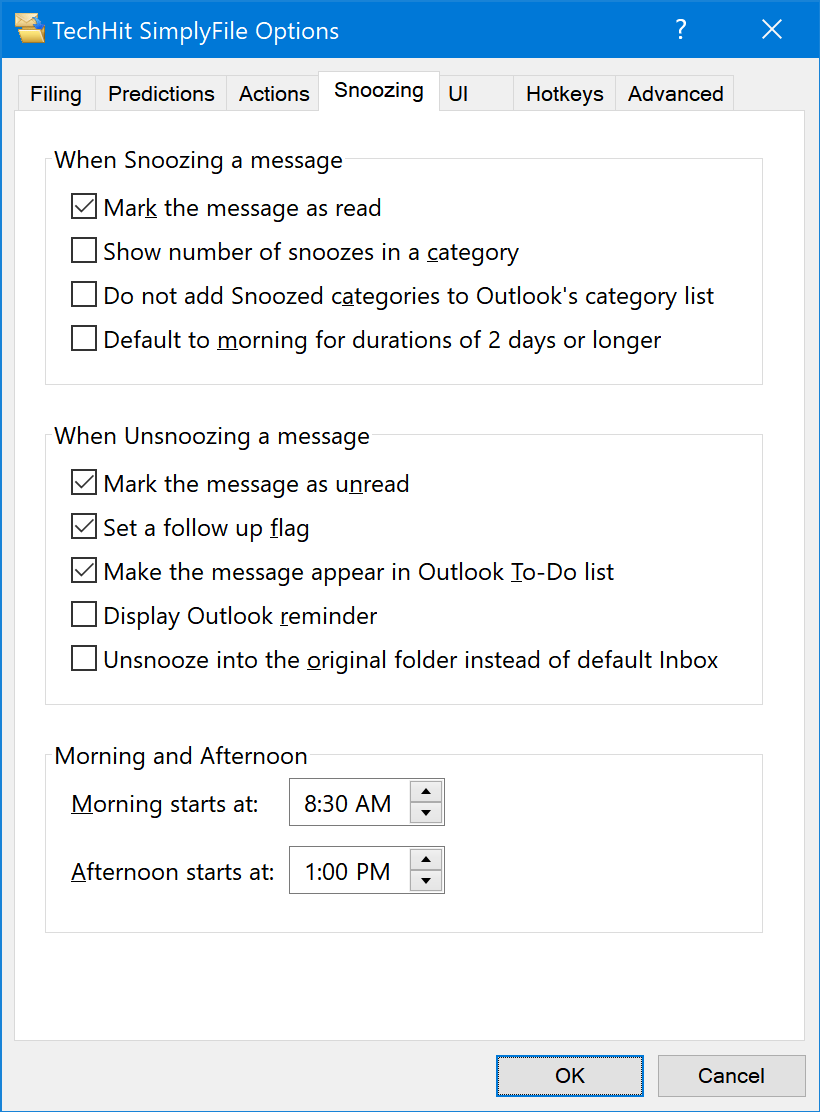
-
When Snoozing A Message¶ This set of options controls how messages are snoozed.
-
Mark The Message As Read¶ Mark messages as read when snoozing.
-
Show Number Of Snoozes In A Category¶ Assign a category with the number of times a message has been snoozed to every snoozed message. This allows you to see how many times you have snoozed a particular message. If you have snoozed it 5 or more times, it may tell you something about the importance of this particular item.
-
Do Not Add Snoozed Categories To Outlook Master Category List¶ Enable this option if you prefer not to have Snooze categories, described above, appear in Outlook’s Category List.
These categories will not have color if you enable this option.
-
Default To Morning For Durations Of 2 Days Or Longer¶ By default, when snoozing for 2, 3, 4, etc. days, the snooze interval is set to exactly 48, 72, 96, etc. hours. Enable this option if you prefer that the message is unsnoozed in the morning of the corresponding day.
-
-
When Unsnoozing A Message¶ This set of options controls how SnoozeIt notifies you about Unsnoozed messages.
-
Mark The Messages Unread¶ Mark the messages as unread when unsnoozing.
-
Set A follow up flag¶ Set Outlook follow up flag on the message. You can then sort your Inbox by the flag column to see all flagged messages at the top.
-
Make The Message Appear In Outlook To-Do List¶ Show this message in the To-Do list in Outlook’s Tasks pane.
-
Display Outlook Reminder¶ Display Outlook reminder window when a message is unsnoozed. If you click “Snooze” in the reminder window, SnoozeIt will snooze this message again for the amount of time you specify there.
-
Unsnooze Into The Original Folder¶ Enable this option to unsnooze message to the folder from which it was snoozed. By default, messages are unsnoozed into the default Inbox.
-
-
Morning Starts At¶ Time of day for the “morning” operations.
-
Afternoon Starts At¶ Time of day for the “afternoon” operations.
UI Tab
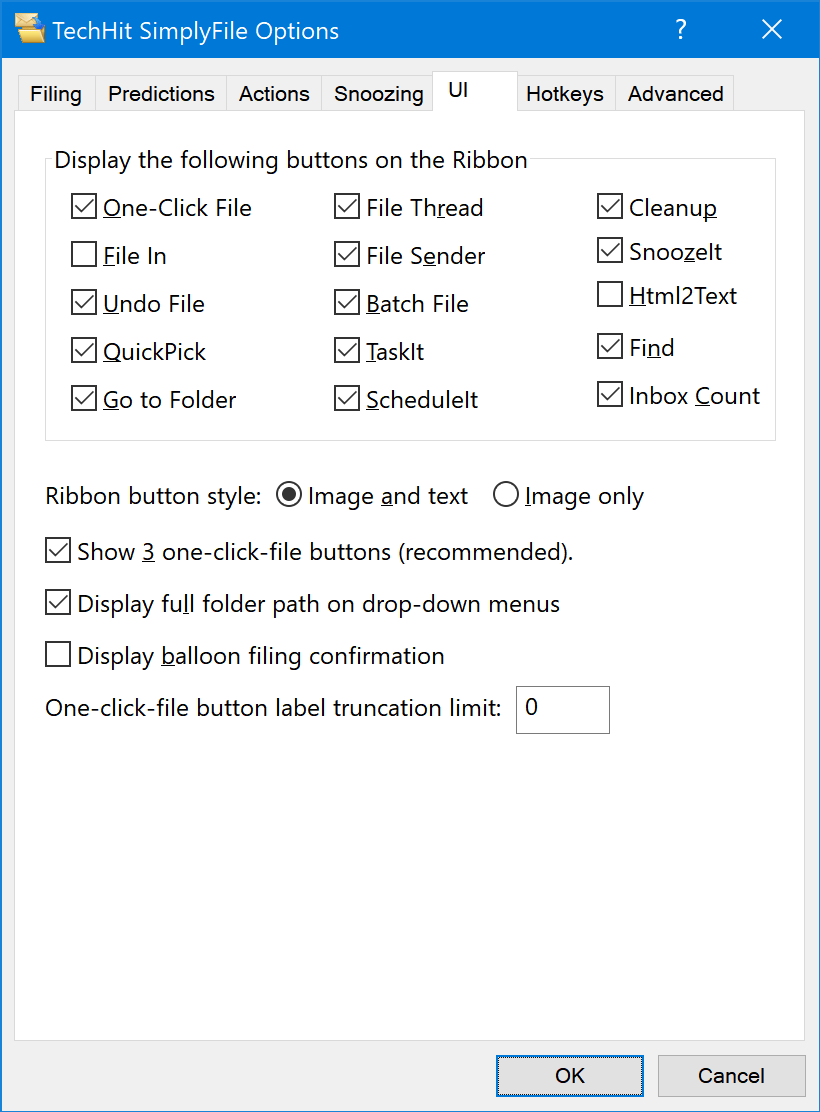
Use this Tab to control which SimplyFile buttons are displayed on the Ribbon. If you are not using a particular command, you can uncheck it to hide its button and save some space.
Tip
Even if you decide to hide a particular button, you can still quickly access its command using hotkeys, or under More -> Actions.
-
Ribbon Button Style¶ -
Image And Text¶ Display both button icons and text. This is the default.
-
Image only¶ Displays only icons without text. Takes very little space. Recommended for advanced users only.
-
-
Show 3 One Click File Buttons¶ This option controls whether SimplyFile shows one or three One Click File Buttons.
This option may be removed from future versions of the product.
-
Display Full Folder Path¶ If you have several folders with the same name in different locations, you can enable this option to have SimplyFile display full path in drop-downs, such as File In or right-click menus.
-
Display balloon confirmation¶ If this option is enabled, SimplyFile will briefly display a balloon notification about each filed message.
This option may be removed from future versions of the product.
-
One Click File Button Truncation Limit¶ Controls the width of the One Click File Buttons.
Folder names will be truncated to the number of characters you specify here. Leave at zero to use the default truncation logic.
Hotkeys Tab
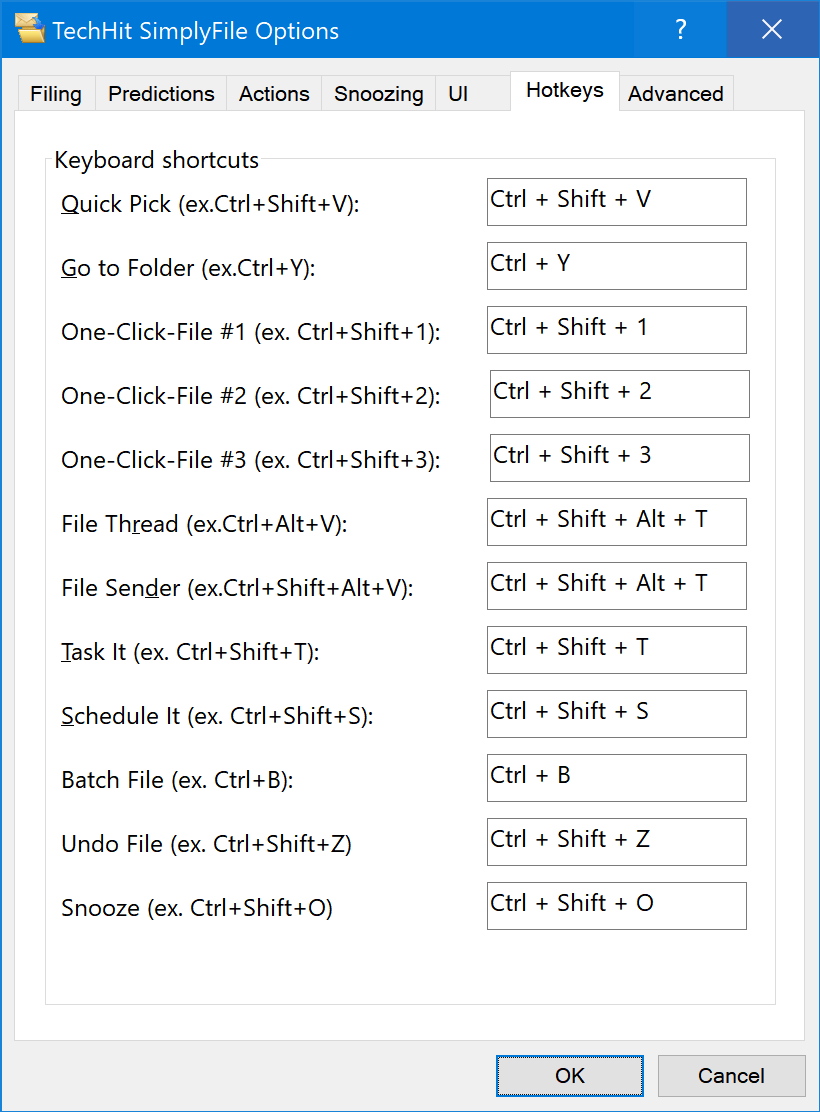
Use this tab to configure keyboard shortcuts (hotkeys) for SimplyFile functions. Hotkeys is an excellent way to make your SimplyFile usage even faster by eliminating the need to reach for the mouse in most cases.
Tip
Hotkeys, along with the Quick Pick Window, make SimplyFile perfectly optimized for fast keyboard-based operation.
To specify a hotkey for a particular function, place the cursor into the corresponding edit field and hit the desired key combination.
Advanced Tab
-
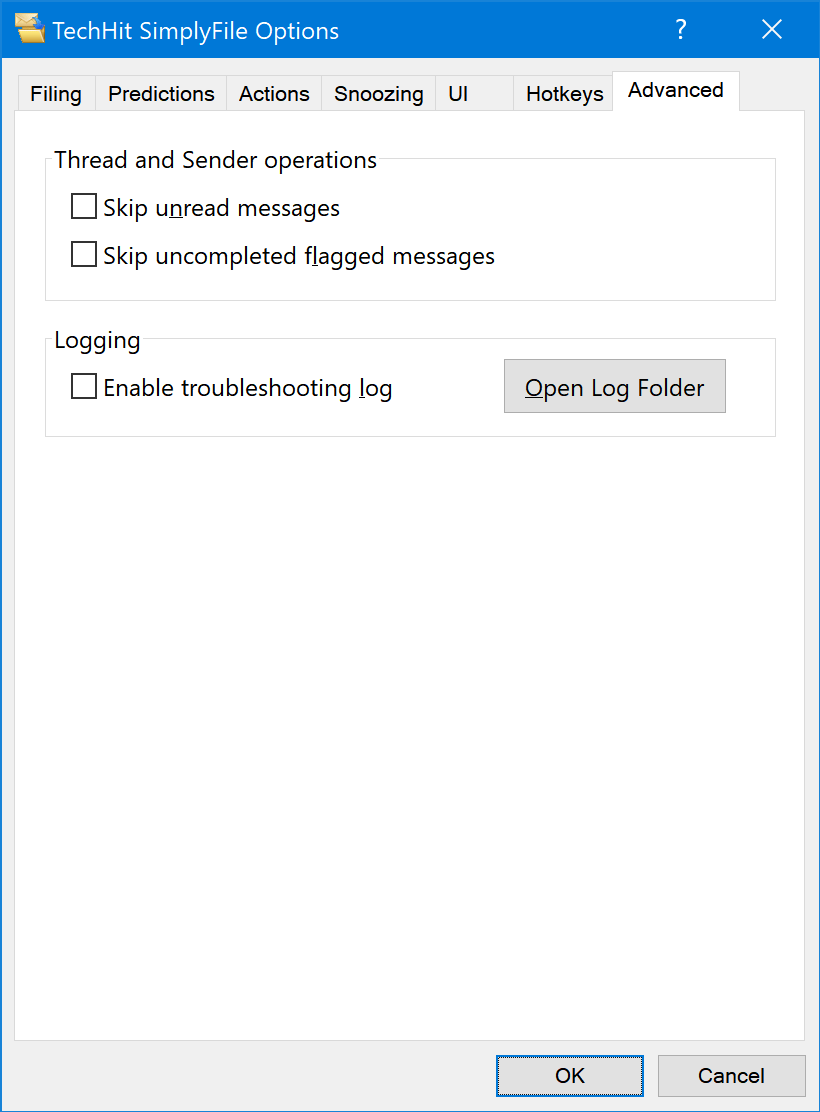
Skip Unread Messages¶ Skip unread messages for File and Delete Thread and Sender operations.
-
Skip Uncompleted Flagged Messages¶ Skip flagged messages (unless they are Flagged as Completed) for File and Delete Thread and Sender operations.
-
Enable Troubleshooting Log¶ Enable SimplyFile diagnostics log.
-
Open Log Folder¶ Display the troubleshooting log in a Windows Explorer Window.